The technique described here uses this kit with a cuffed 5.0 Melker cricothyrotomy cannula. Alternative equipment is available (Patel & Frek, 2008) but the basic principles and steps of the 'needle' technique are the same:
- Vertical skin incision
- Needle cannulation through the CTM
- Wire insertion through the needle
- Withdrawal of the needle over the wire
- Dilation and insertion of a large-bore cricothyrotomy cannula over the wire
In more detail, this is the suggested workflow:
1. Position the patient
Head and neck should be extended or even hyper-extended to reveal as much of the anterior neck as possible. In practice this means removing any support/ pillow from under the head.
2. Position yourself
If you are right-handed, stand at the patient's left schoulder. If you are left-handed, vice versa. The non-dominant hand palpates the anatomy and identifies the cricothyroid membrane, the dominant hand cannulates.
3. Open and prepare the kit
The kit used for this description of the technique contains a 5.0 cuffed Melker cricothyrotomy cannula with a pre-loaded internal dilator. Choose one of the two needles in the kit, connect it to the included 5ml syringe and fill the syringe with 2ml of saline.
4. Identify cricothyroid membrane
Palpate with your non-dominant hand. We suggest to start palpating at the sternal notch with your thumb, index and middle finger, and move upwards along the tracheal rings until the cricoid cartilage is encountered. The 'ditch' above the cricoid cartilage is the CTM. Keep your fingers spread slightly to 'fix' the larynx in the midline and keep the CTM between your fingers. This maneuver has been described as the 'laryngeal handshake'. Don't move your hand for steps 5 and 6.
5. Vertical incison over CTM
Make a generous, deep, vertical skin incision of at least 3cm from caudad to cranial over the CTM with your dominant hand. Make sure the incision is deep enough to extend all the way down to the laryngeal structures. It could bleed a bit! Keep your palpating hand in place for step 6.
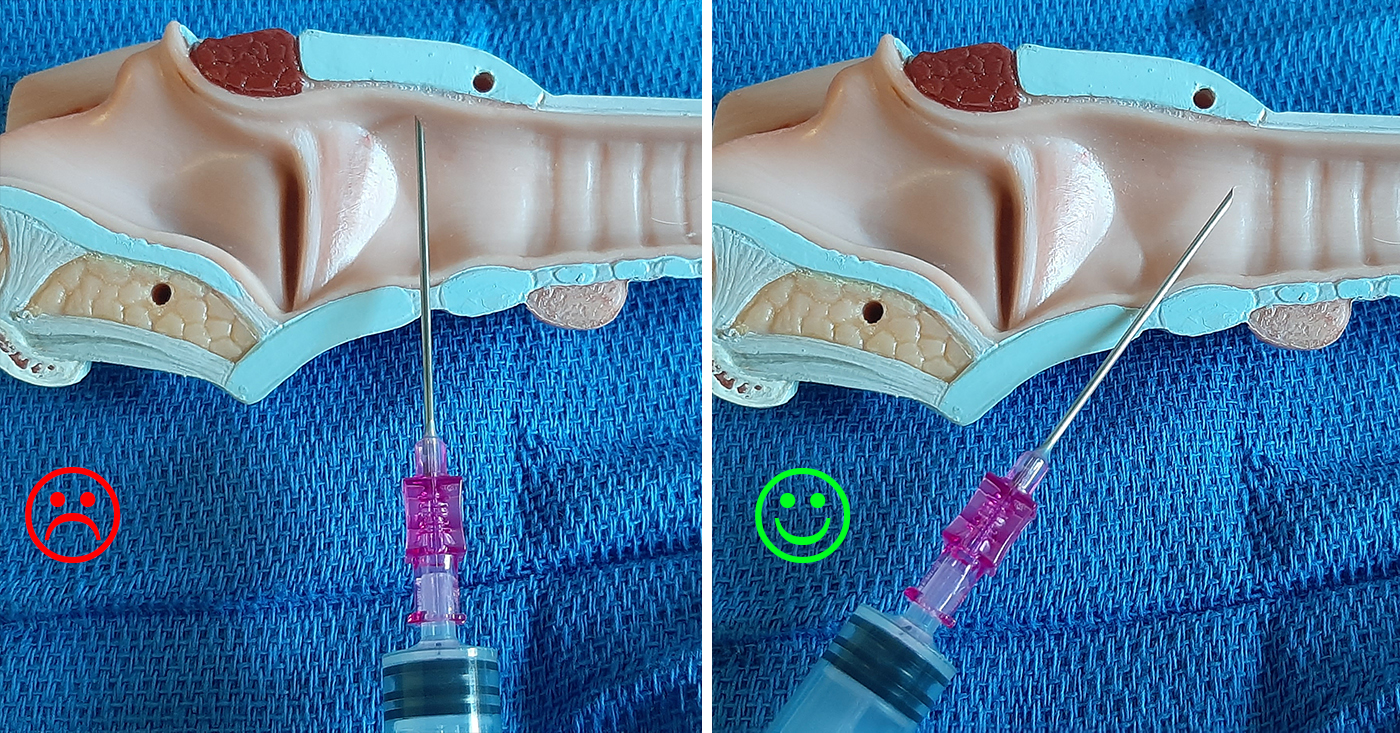
6. Cannulate the trachea
Through the incison, with your dominant hand, start cannulating with the needle slightly angled caudad under constant gentle aspiration. The bevel opening of the needle should face anteriorly. Insertion at an angle (not straight down to the floor) increases the safety margin before the needle accidentally pierces the posterior tracheal wall and allows for easier wire passage.

Once you can aspirate air freely, steady the hub of the needle with your non-dominant hand resting on the patient's chest to minimize accidental needle movement.
7. Introduce the wire through the cannula
Feed the soft-tippend end of the wire through the cannula. You should not encounter any resistance with advancing the wire. Remove the cannula.
8. Advance cricothyrotomy cannula
The Melker cannula is advanced over the wire together with the pre-loaded dilator, not sequentially with your dominant hand in a caudad direction. Grab the cannula so that the dilator does not move/ slide back during advacement through tissue and the wire is free to exit through the proximal end of the dilator. If the depth of your intial vertical skin incision (step 5) was insufficient you might have to use the scalpel again alongside the wire to make an additional stab incision through the CTM.
Note the curvature of the cannula as you insert it in one 'scooping' motion. Do not twist the cannula right and left or 'screw' it into the neck since this is likely to bend/ damage the wire.
9. Remove dilator, secure cannula
Use the included tape around the neck to tie the cannula in place.
10. Oxygenate
The Melker cricothyrotomy cannula has a standard 15mm connector which means you can use any anesthetic breathing system to connect to the device. It is therefore possible to do conventional ventilation and inhaled anesthetic delivery with this technique, like you would through any other 5.0 ET tube.
Add new comment